Hello Readers
This blog is to help fellow consultants to start their journey on Power Automate. We all know how easy it is to create a flow (Watch #TGIF Episode 2 here, if not already).
I am sure as a Business user or a functional consultant, you must have had a situation where you needed someone technical to complete your flow. Most of this bottleneck is because as non-technical people we don’t know what ‘ODATA Query’ is?
Coming from Dynamics 365 background, I never required such filters for native workflows of D365. But here we are moving forward and learning together to be able to work with Flows.
This post will talk about the following two filter types you need while building a flow:
- ODATA filter query
- Filter array
Before we commence with the filters, i will try to explain you the components of ODATA filter query:
| 1.Field or Column Name |
2.Operator |
3.Field value you want to check/filter |
Sequence: In most queries the sequence of the components remains like ‘fieldname operator fieldvalue’ but in some cases like contains/does not contains sequence and structure changes to ‘operator(fieldname,’fieldvalue’)’
A few operators:
| Operator |
Description |
| eq |
Equal to |
| ne |
Not equal to |
| contains |
contains |
| not contains |
Does not contains |
| gt |
Greater than |
| lt |
Less than |
| ge |
Greater than or equal to |
| le |
Less than or equal to |
| and |
And |
| or |
Or |
| startswith |
Start with the specified value |
| endswith |
End with the specified value |
ODATA filter query
1.Contains for text fields
This one is for text fields like Topic, Subject, Phone, City, Street 1 etc.
Filter query= contains(textfieldschemaname,’value’)
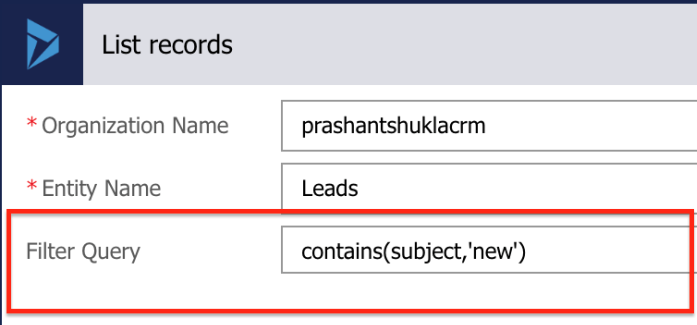
e.g. if I have to check whether the ‘Subject/Topic’ of a Lead record contains ‘New’ in it; my filter would be contains(subject,’new’)

2. Does not contains for text fields
This one is for text fields like Topic, Subject, Phone, City, Street 1 etc.
Filter query= not contains(textfieldschemaname,’value’)
e.g. if I have to check that the ‘Subject/Topic’ of a Lead record does not contains ‘New’ in it; my filter would be not contains(subject,’new’)
3.Contains data (Is not blank)
This one is for both text and option set fields
Filter query= textfieldschemaname ne null
Filter query= optionsetfieldschemaname ne null
e.g. if I have to filter where ‘Job title’ contains data or is not blank; my filter would be jobtitle ne null
e.g. if I have to filter where ‘Rating’ contains data or is not blank; my filter would be leadqualitycode ne null
4. Does not contains data (Is blank)
This one is for both text and option set fields
Filter query= textfieldschemaname eq null
Filter query= optionsetfieldschemaname eq null
e.g. if I have to filter where ‘Job title’ does not contains data or is blank; my filter would be jobtitle eq null
e.g. if I have to filter where ‘Rating’ does not contains data or is blank; my filter would be leadqualitycode eq null
5.Contains for option sets
This one is for option set fields like Rating, Lead Source, Industry, Type etc.
Filter query= optionsetfieldschemaname eq optionsetnumericvalue
e.g. if I have to filter lead’s with rating ‘Hot’ (value =1); my filter would be leadqualitycode eq 1
Note: As per my understanding, you can’t check option set label in ODATA filter but you can in filter array.
6.Does not contains for option sets
This one is for option set fields like Rating, Lead Source, Industry, Type etc.
Filter query= optionsetfieldschemaname ne optionsetnumericvalue
e.g. if I have to filter lead’s with rating ‘Hot’ (value =1); my filter would be leadqualitycode ne 1
7.Contains with ‘OR’ on same field
Filter query= contains(field1name,’value1′) or contains(field1name,’value2′)
Filter query= optionsetfieldname1 eq optionsetnumericvalue1 or optionsetfieldname1 eq optionsetnumericvalue2
e.g. if I have to filter where ‘Job title’ contains ‘Manager’ or ‘Consultant’; my filter would be contains(jobtitle,’manager’) or contains(jobtitle,’consultant’)
e.g. if I have to filter where ‘Rating’ contains either ‘Hot’ or ‘Warm’ data; my filter would be leadqualitycode eq 1 or leadqualitycode eq 2
8. Contains with ‘AND’ on same text field
Filter query= contains(textfield1name,’value1′) and contains(textfield1name,’value2′)
e.g. if I have to filter where ‘Topic’ contains ‘New’ and ‘Interested’; my filter would be contains(subject,’new’) and contains(subject,’interested’)
9.Filter an option set checking two or more values
Filter query= optionsetfieldname1 eq optionsetnumericvalue1 or optionsetfieldname1 eq optionsetnumericvalue2
e.g. if I have to filter where ‘Rating’ contains either ‘Hot’ or ‘Warm’ data; my filter would be leadqualitycode eq 1 or leadqualitycode eq 2

10. Filter by checking two different option sets
Filter query= optionsetfieldname1 eq optionsetnumericvalue1 or optionsetfieldname2 eq optionsetnumericvalue2
e.g. if I have to filter leads where ‘Rating’ contains ‘Hot’ and ‘Lead Source’ contains ‘Advertisement’; my filter would be leadqualitycode eq 1 and leadsourcecode eq 1

11.Starts with/Begins with
This is for text fields only
Filter query=startswith(fieldname,’startvalue’)
e.g. if I have to filter all Australian leads , I will look at ‘Business Phone’ starts with country code +61; my filter would be startswith(telephone1,’+61′)
e.g. if I have to filter leads from Australia or New Zealand, I will look at ‘Business Phone’ starts with country code +61 or +64; my filter would be startswith(telephone1,’+61′) or startswith(telephone1,’+64′)
e.g. if I have to filter leads having ‘Business Phone’ from Australia but ‘Mobile Phone’ from New Zealand, I will look at ‘Business Phone’ starts with country code +61 and +64; my filter would be startswith(telephone1,’+61′) and startswith(mobilephone,’+64′)
12.Ends with
This is for text fields only
Filter query=endswith(fieldname,’endvalue’)
e.g. if I have to filter all leads where ‘Website’ ends with ‘.org’; my filter would be endswith(websiteurl,’org’)
e.g. if I have to filter all leads where ‘Website’ either ends with ‘.org’ or ‘.com’; my filter would be endswith(websiteurl,’org’) or endswith(websiteurl,’com’)
e.g. if I have to filter all leads where ‘Website’ ends with ‘.org’ and email ends with ‘.com’; my filter would be endswith(websiteurl,’org’) and endswith(emailaddress1,’com’)
13.Greater than
This is for Numbers and date fields only
Filter query=datefield gt ‘specificdate’
Filter query=datetimefield gt ‘specificdatetime’
Filter query=numberfield gt specificnumber (No, ” here)
e.g. if I have to filter leads created after 10th August 2019
createdon gt ’10/08/2019′
e.g. if I have to filter leads created after 5AM on 10th August 2019; my filter would be
createdon gt ’10/08/2019 05:00′
e.g. if I have to filter leads created after 5:30AM on 10th August 2019; my filter would be
createdon gt ’10/08/2019 05:30′

e.g. if I have to filter leads created after 5PM on 10th August 2019; my filter would be
createdon gt ’10/08/2019 17:00′
e.g.if I have to filter leads created after 5:30PM on 10th August 2019; my filter would be
createdon gt ’10/08/2019 17:30′
e.g. if I have to filter leads where annual revenue is more than $2000000
revenue gt 2000000
e.g. if I have to filter leads where annual revenue is more than $2000000 and number of employees is more than 500
revenue gt 2000000 and numberofemployees gt 500

14.Less than
This is for Numbers and date fields only
Filter query=datefield lt ‘specificdate’
Filter query=datetimefield lt ‘specificdatetime’
Filter query=numberfield lt specificnumber (No, ” here)
e.g. if I have to filter leads created before 10th August 2019
createdon lt ’10/08/2019′
e.g. if I have to filter leads created before 5AM on 10th August 2019; my filter would be
createdon lt ’10/08/2019 05:00′
e.g. if I have to filter leads created before 5:30AM on 10th August 2019; my filter would be
createdon lt ’10/08/2019 05:30′
e.g. if I have to filter leads created before 5PM on 10th August 2019; my filter would be
createdon lt ’10/08/2019 17:00′
e.g.if I have to filter leads created before 5:30PM on 10th August 2019; my filter would be
createdon lt ’10/08/2019 17:30′
e.g. if I have to filter leads where annual revenue is less than $2000000
revenue lt 2000000
e.g. if I have to filter leads where annual revenue is less than $2000000 and number of employees is less than 500
revenue lt 2000000 and numberofemployees lt 500
15.Less than or equal to and Greater than or equal to
This is for Numbers and date fields only
Filter query=datefield ge ‘specificdate’
Filter query=datetimefield ge ‘specificdatetime’
Filter query=numberfield ge specificnumber (No, ” here)
Filter query=datefield lt ‘specificdate’
Filter query=datetimefield le ‘specificdatetime’
Filter query=numberfield le specificnumber (No, ” here)
e.g. if I have to filter leads created after or on 10th August 2019
createdon ge ’10/08/2019′
e.g. if I have to filter leads created after or at 5AM on 10th August 2019; my filter would be
createdon ge ’10/08/2019 05:00′
e.g. if I have to filter leads created after or at 5:30AM on 10th August 2019; my filter would be
createdon ge ’10/08/2019 05:30′
e.g. if I have to filter leads created after or at 5PM on 10th August 2019; my filter would be
createdon ge ’10/08/2019 17:00′
e.g.if I have to filter leads created after or at 5:30PM on 10th August 2019; my filter would be
createdon ge ’10/08/2019 17:30′
e.g. if I have to filter leads where annual revenue is more than or equal to $2000000
revenue ge 2000000
e.g. if I have to filter leads where annual revenue is more than or equal to $2000000 and number of employees is more than or equal to 500
revenue ge 2000000 and numberofemployees ge 500
e.g. if I have to filter leads created before or on 10th August 2019
createdon le ’10/08/2019′
e.g. if I have to filter leads created before or at 5AM on 10th August 2019; my filter would be
createdon le ’10/08/2019 05:00′
e.g. if I have to filter leads created before or at 5:30AM on 10th August 2019; my filter would be
createdon le ’10/08/2019 05:30′
e.g. if I have to filter leads created before or at 5PM on 10th August 2019; my filter would be
createdon ge ’10/08/2019 17:00′
e.g.if I have to filter leads created before or at 5:30PM on 10th August 2019; my filter would be
createdon ge ’10/08/2019 17:30′
e.g. if I have to filter leads where annual revenue is less than or equal to $2000000
revenue ge 2000000
e.g. if I have to filter leads where annual revenue is less than or equal to $2000000 and number of employees is less than or equal to 500
revenue le ‘2000000’ and numberofemployees le 500
e.g. if I have to filter leads where annual revenue is less than or equal to $2000000 and number of employees is more than or equal to 500
revenue le ‘2000000’ and numberofemployees ge 500
Filter array
These are very much similar to what we get in D365 native workflows except for puttin the value ourselves.
1.Option set label
Select the label field dynamically and not the value field. Then specify your label value on the right.


2. Option set value
Select the value field dynamically and not the label field. Then specify your option set value on the right.

3. Text fields
This one is for text fields like Topic, Subject, Phone, City, Street 1 etc.

4. Number and date fields
This is for number and date fields.


Those are enough filters to get you started. 🙂
Hope you find this helpful!
Subscribe to my YouTube
Thanks!
Let’s keep sharing!


