Category: TGIF Thank God it’s Flow!

Sharing my MVP Award with you!

Hi Everyone

A huge thank you to all for supporting me by watching my videos, subscribing to my channel and blog. it couldn’t have been possible without your support and that’s why I decided to share my MVP award with you by unboxing it together.

I received the notification of my award via email on 1st Jan 2020 and I received the actual award kit itself on 20th Jan 2020. Since I wanted to unbox it together with you, I thought I will wait until I can make a video. It was hard to see the box but not be able to open it but I was happy that I am sharing it with you guys.

I shared the news on Linkedin and received 35000+ views on my post and that’s just amazing for me. Follow me on linkedin, twitter and if you’ve not subscribed to my channel, do it now. 🙂

Unboxing video here:

Subscribe to my channel and follow my blog.

Thanks!

Let’s keep sharing!

#TGIF Episode 8: Top Reasons to Use Power Automate (Power Automate vs Dynamics 365 Workflows)

Hi Readers and Viewers

Merry Christmas and a very Happy New Year! Thanks for your support in 2019 🙂

In this video, we will look at the top reasons for you to start using Power Automate. Also, this is the last episode of the series so I thought what’s better than a comparison. If you remember, in my first episode I asked you that have you found your reason to use Power Automate yet? Well, if you haven’t I am giving you the reasons in this episode.

Power Automate FlowDynamics 365 CE Workflow
No Code SMS Integration https://txtsync.com Not OOTB
Social Media IntegrationNot OOTB
Convert to PDF (Multiple ways available)Not OOTB
Copy Salesforce Account/Contacts to D365Not OOTB
Sync email attachements to OneDriveNot OOTB
Gmail to Dynamics 365 and Dynamics 365 to Google calendar Not OOTB
Updating 1 to Many relationship recordsNot OOTB
Update a lookup field from text field
https://diyd365.com/2019/03/12/update-a-lookup-from-a-text-field-no-code-solution/
Not OOTB
Update opportunity/order/quote from opportunity/order/quote close forms
https://diyd365.com/2019/09/13/how-to-update-an-opportunity-from-opportunity-close-and-send-an-email-on-opportunity-close-using-ms-flows-no-code-solution/
Not OOTB

Everything in the list above is in context of Dynamics 365. Out of the box (OOTB) Dynamics 365 workflows can’t do any of the above. You will have to create a custom workflow (#code) or a plugin (#code).

Hope I have given you reasons to start working on Power Automate.

Video here:

Fundraising for Rural Aid Australia- TGIF Shirts, here.

Let me know your thoughts!

Subscribe to my channel and follow my blog.

Thanks!

Let’s keep sharing!

#TGIF Episode 7: Using Power Automate (Microsoft Flow) Mobile App To Build A Flow

Hi Readers and Viewers

In this blog & video, we will look at the ease of using ‘Power Automate’ Mobile App.

First half of the blog talks about the app structure and components/features available (Almost everything is available)

Second half of the blog includes a video where I am demonstrating the app and also create a Flow via Power Automate Mobile App.

Download the app from apple store https://apps.apple.com/au/app/power-automate/id1094928825

Download the app from google play store https://play.google.com/store/apps/details?id=com.microsoft.flow&hl=en

First up, what’s available in the mobile app?

  1. Activity
    • Feed
    • Approvals
  2. Browse
  3. Buttons
  4. Flows
  5. Account

Activity Section

Feed tab

  • You can check the sessions of your Flows here.
  • You can check any notifications you received here.

Approvals tab

  • You can check the approvals list here

Browse Section

Browse Templates by Services

  • Browse by services like Excel, OneDrive etc.

Browse Templates by Categories

  • Browse by categories like mobile, featured, collect data etc.

Button Section

  • All your on-demand flows triggering on a button click are here or can be created from here

Flows Section

  • All your flows will be visible here along with the last run status.
  • All your button flows or on-demand flows will be visible here as well
  • You can click on the flow to perform the following actions:
    • Enable/Disable flow
    • Edit/Modify flow
    • Check owners/Share flow
    • Run history of the flow
    • Save as
    • Delete the flow

Account Section

  • This is where all the settings for your Power Automate App/Account are available. Following actions can be performed here:
    • Select/Change Environment
    • Help and Support
      • Learn
      • Contact Support (Support.microsoft.com)
      • Suggest a Feature (Powerusers Power Automate idea page)
    • About
      • Version
      • License Terms
      • Third Party notices
    • Privacy
      • Privacy (privacy.microsoft.com)
      • Send usage data (yes/no)
    • Give feedback
      • How was your experience?
      • Contact Support
        • Visit community
        • Open support ticket

Video on using the app here:

Hope you find it helpful!

Fundraising for Rural Aid Australia- TGIF Shirts, here.

Let me know your thoughts!

Subscribe to my channel and follow my blog.

Thanks!

Let’s keep sharing!

#TGIF Quick Tip on UI Flows (Power Automate, renaming a UI flow)

Hello Readers

This quick tip is part of my Thank God it’s Flow #TGIF series. There are two tips in this post:

  1. Renaming your UI flow
  2. Modifying and removing connections

Renaming your UI Flow: For general flows you just hit on the pencil/edit button and can rename them by clicking on the name at the top as shown below:

Screen Shot 2019-12-08 at 1.41.09 pm.png

This doesn’t work for UI Flows. Instead you have to click on the name and the click the edit button shown in the screenshot below:

Screen Shot 2019-12-08 at 1.35.17 pm.png

Modifying and removing connections: 

All connections are available under Data on the left navigation. So if you reach maximum connection limit and are thinking how to delete/remove one. Here is the place. Just click on the ellipses (…) and select an option

Screen Shot 2019-12-08 at 1.36.42 pm.png

Hope it helps!

Subscribe to my channel and follow my blog.

Thanks!

Let’s keep sharing!

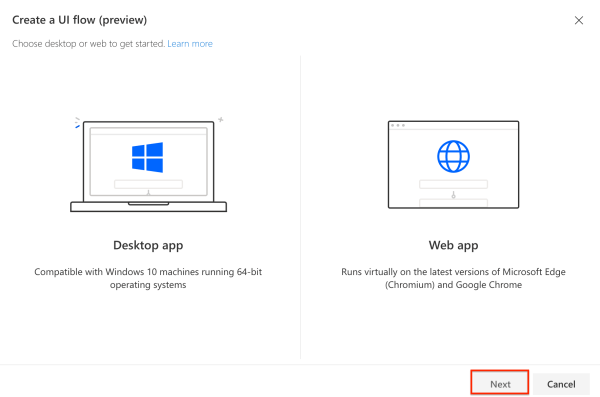
#TGIF Episode 6: UI Flows (RPA) in Power Automate (Both desktop & web app)

Hello Readers and Viewers

In this episode we will learn about the business use cases of robotic process automation or UI Flows. If you want to learn about setting up UI flows, please read this post https://diyd365.com/2019/12/11/everything-you-need-to-run-a-ui-flow-power-automate

We will look at both desktop and web app.

I have taken two business scenarios:

  1. Automation Testing of Dynamics 365– As a functional consultant and business user, we always perform unit testing manually. So I will demonstrate a scenario where we can automate it with the help of UI Flows. Our test scenario is; As a salesperson, I must be able to login to MS Dynamics 365 with office credentials and be able to create a customer/account.
  2. MYOB AccountRight integration with Dynamics 365– As a functional consultant and business user I don’t know a straight forward integration between MYOB and Dynamics 365. So I will demonstrate that whenever you create an invoice in Dynamics 365, UI Flow will create a customer and then invoice in MYOB AccountRight.

Video here:

I hope both my scenarios add some value to your business and daily work life. You can obviously extend it to any level.

Fundraising for Rural Aid Australia- TGIF Shirts, here.

Let me know your thoughts!

Subscribe to my channel and follow my blog.

Thanks!

Let’s keep sharing!


Everything you need, to run a UI Flow (Power Automate)

Hello Readers

In this post I will take you through the setup required to run a UI Flow (Robotic Process Automation) RPA. Now you might not need it if you running your flow manually and it is not triggered by a button, event etc.

Step 1: Log on to flow.microsoft.com

Screen Shot 2019-12-08 at 12.11.41 pm.png

Step 2: Go to My Flows>>UI Flows (tab)

Screen Shot 2019-12-08 at 12.12.20 pm.png

Step 3: Get a CDS subscription

If you don’t have a CDS subscription yet, you need to get it to be able to create UI flows.

Step 4: Once you’ve got the CDS subscription, you will be able to create a UI flow by clicking on ‘+New’ at the top or ‘Create a UI Flow’ at the bottom of your screen.

Screen Shot 2019-12-08 at 12.16.33 pm.png

Step 5: Select an app to create your UI Flow. There are two types of app present, you can select based on what you want to automate.

Desktop App: Example- if I want to automate customer creation in MYOB AccountRight (Accounting Application)

Web App: Example- if I want to automate account creation in Dynamics 365 Customer Engagement

Select your UI app and click ‘Next’

Screen Shot 2019-12-08 at 12.23.41 pm

Step 6: Download the UI Flows Installer and run it

6a. UI flow installer here https://go.microsoft.com/fwlink/?linkid=2102613

6b. Activate UI flow browser extension

6c. Install Selenium IDE https://go.microsoft.com/fwlink/?linkid=2107665

That’s all you need to get started.

Note: The above steps are complete if you are running UI flow manually every time

Run a UI flow from a button, business process flow or an event

To do this, you will have to follow additional set up steps:

Note: This would differ based on which app you’ve selected desktop or web but you would not need any other steps than the one mentioned below. For web app, you will be asked to select a browser from Edge chromium or google chrome.

Step 7: Create another Flow from which you want to trigger UI flow (or include Ui flow as a step in there)

Step 8: Connection

When you add the UI flow step, you will be asked about connection with following attributes:

Connection name: Name it anything logical

Username: “domain/name” this is the username of your machine/laptop. Just in case you’re using a personal laptop and don’t know about your domain name or username, you can check it by going windows start button and type cmd. Next type %username%

Screen Shot 2019-12-08 at 12.52.55 pm.png

Password: This is your machine’s/laptops password

Gateway: Click on new gateway if you’ve not created one yet and move to Step 9.

Screen Shot 2019-12-08 at 12.59.48 pm.png

Step 9: Install On-premise data gateway https://docs.microsoft.com/en-gb/data-integration/gateway/service-gateway-update?WT.mc_id=BA-MVP-5003605

Email, username and password while setting this up would be the same which you used to login to flow.microsoft.com (in most cases). This will establish your connection with azure

Make sure that assign permissions  to ‘NT Service\PBIEgwService’  for this folder/path C:\Windows\ServiceProfiles\PBIEgwService\Documents\Power BI Desktop\Custom Connectors

Screen Shot 2019-12-08 at 12.45.04 pm

As of today, that’s all you need to run a UI flow. This feature is still in preview so please expect enhancements and changes.

If you want to see how to make a UI Flow, please stay tuned as I will release a video soon.

Hope it helps!

Subscribe to my channel and follow my blog.

Thanks!

Let’s keep sharing!

#TGIF Episode 5: Business Process Flows in Power Automate

Hello Readers and Viewers

In this episode we will try to understand all about  Business Process Flows (BPFs). Let’s first look at types of Flow available in Power Automate:

  • Flow
    • Team Flow (when you share a flow)
  • Business Process Flow
    • Immersive
    • Non-Immersive/Original/Old
  • UI Flow (RPA)

Screen Shot 2019-11-30 at 2.20.04 pm.png

What are Business Process Flows?

Business process flows provide a guide for people to get work done. They provide a streamlined user experience that leads people through the processes their organization has defined for interactions that need to be advanced to a conclusion of some kind. This user experience can be tailored so that people with different security roles can have an experience that best suits the work they do.

Source: https://docs.microsoft.com/en-us/dynamics365/customerengagement/on-premises/customize/business-process-flows-overview?WT.mc_id=BA-MVP-5003605

Immersive vs Original/Non-Immersive

Screen Shot 2019-11-30 at 2.23.44 pm.png

Creating Business Process Flows for Model Driven Apps

BPF in Dynamics 365 Part I

BPF in Dynamics 365 Part II

Adding BPFs in a Model Driven App

https://docs.microsoft.com/en-us/powerapps/maker/model-driven-apps/add-edit-app-components?WT.mc_id=BA-MVP-5003605

Video here:

Fundraising for Rural Aid Australia- TGIF Shirts, here.

Let me know your thoughts!

Subscribe to my channel and follow my blog.

Thanks!

Let’s keep sharing!

#TGIF Episode 4: Understanding ‘Scope’ in Flows (Power Automate)

Hello Readers and Viewers

In this episode we will try to understand ‘Scope’ in flows. This is a comparatively short episode as I have used visuals to explain scope.

Scope is available in following categories:

  • User
  • Business Unit
  • Parent Child Business Unit
  • Organisation
  • Custom (Yes, you can enter a custom value)

Dynamics 365 people, does it reminds you of something? Yes, you guessed it right. This is coming from scope of native D365 workflows. But in Power Automate scope is only available if you’re using Common Data Services (CDS) as a data connection. I am providing some screenshots below which might help:

Screen Shot 2019-11-23 at 10.34.04 amScreen Shot 2019-11-23 at 10.35.14 amScreen Shot 2019-11-23 at 10.37.06 amScreen Shot 2019-11-23 at 10.38.26 am

Video here:

Fundraising for Rural Aid Australia- TGIF Shirts, here.

Let me know your thoughts!

Subscribe to my channel and follow my blog.

Thanks!

Let’s keep sharing!

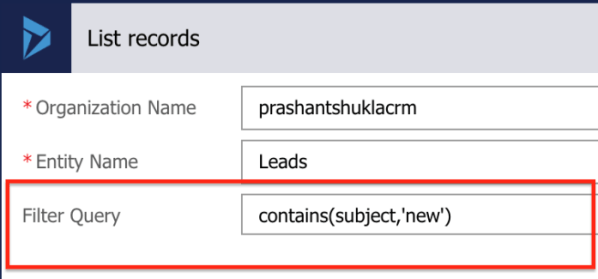
#TGIF Episode 3: Most Common ODATA Filter Queries

Hi Readers and Viewers

This episode is to summarise my blog post “Every Power Automate Filter Query You Ever Wanted To Know“.

We will look at the following combinations of ODATA queries:

Contains and does not contains for text fields

Contains and does not contains for Option Sets

  1. Is blank and is not blank
  2. Contains with OR/AND conditions
  3. Check two or more option set values
  4. Starts with/Ends with
  5. Greater than/Less than
  6. Greater than or equal to/Less than or equal to

Video here:

Fundraising for Rural Aid Australia- TGIF Shirts, here.

Let me know your thoughts!

Subscribe to my channel and follow my blog.

Thanks!

Let’s keep sharing!

Every Power Automate (MS Flow) Filter Query You Ever Wanted To Know As A Functional Consultant

Hello Readers

This blog is to help fellow consultants to start their journey on Power Automate. We all know how easy it is to create a flow (Watch #TGIF Episode 2 here, if not already).

I am sure as a Business user or a functional consultant, you must have had a situation where you needed someone technical to complete your flow. Most of this bottleneck is because as non-technical people we don’t know what ‘ODATA Query’ is?

Coming from Dynamics 365 background, I never required such filters for native workflows of D365. But here we are moving forward and learning together to be able to work with Flows.

This post will talk about the following two filter types you need while building a flow:

  1. ODATA filter query
  2. Filter array

Before we commence with the filters, i will try to explain you the components of ODATA filter query:

1.Field or Column Name 2.Operator 3.Field value you want to check/filter

Sequence: In most queries the sequence of the components remains like ‘fieldname operator fieldvalue’ but in some cases like contains/does not contains sequence and structure changes to ‘operator(fieldname,’fieldvalue’)’

A few operators: 

Operator Description
eq Equal to
ne Not equal to
contains contains
not contains Does not contains
gt Greater than
lt Less than
ge Greater than or equal to
le Less than or equal to
and And
or Or
startswith Start with the specified value
endswith End with the specified value

ODATA filter query

1.Contains for text fields

This one is for text fields like Topic, Subject, Phone, City, Street 1 etc.

Filter query= contains(textfieldschemaname,’value’)

e.g. if I have to check whether the ‘Subject/Topic’ of a Lead record contains ‘New’ in it; my filter would be contains(subject,’new’)

Screen Shot 2019-11-16 at 1.14.33 pm

2. Does not contains for text fields

This one is for text fields like Topic, Subject, Phone, City, Street 1 etc.

Filter query= not contains(textfieldschemaname,’value’)

e.g. if I have to check that the ‘Subject/Topic’ of a Lead record does not contains ‘New’ in it; my filter would be not contains(subject,’new’)Screen Shot 2019-11-16 at 1.15.24 pm.png

3.Contains data (Is not blank)

This one is for both text and option set fields

Filter query= textfieldschemaname ne null

Filter query= optionsetfieldschemaname ne null

e.g. if I have to filter where ‘Job title’  contains data or is not blank; my filter would be jobtitle ne null

e.g. if I have to filter where ‘Rating’  contains data or is not blank; my filter would be leadqualitycode ne null

4. Does not contains data (Is blank)

This one is for both text and option set fields

Filter query= textfieldschemaname eq null

Filter query= optionsetfieldschemaname eq null

e.g. if I have to filter where ‘Job title’  does not contains data or is blank; my filter would be jobtitle eq null

e.g. if I have to filter where ‘Rating’  does not contains data or is blank; my filter would be leadqualitycode eq null

5.Contains for option sets

This one is for option set fields like Rating, Lead Source, Industry, Type etc.

Filter query= optionsetfieldschemaname eq optionsetnumericvalue

e.g. if I have to filter lead’s with rating ‘Hot’ (value =1); my filter would be leadqualitycode eq 1

Note: As per my understanding, you can’t check option set label in ODATA filter but you can in filter array.

6.Does not contains for option sets

This one is for option set fields like Rating, Lead Source, Industry, Type etc.

Filter query= optionsetfieldschemaname ne optionsetnumericvalue

e.g. if I have to filter lead’s with rating ‘Hot’ (value =1); my filter would be leadqualitycode ne 1

7.Contains with ‘OR’ on same field

Filter query= contains(field1name,’value1′) or contains(field1name,’value2′)

Filter query= optionsetfieldname1 eq optionsetnumericvalue1 or optionsetfieldname1 eq optionsetnumericvalue2

e.g. if I have to filter where ‘Job title’  contains ‘Manager’ or ‘Consultant’; my filter would be contains(jobtitle,’manager’) or contains(jobtitle,’consultant’)

e.g. if I have to filter where ‘Rating’  contains either ‘Hot’ or ‘Warm’ data; my filter would be leadqualitycode eq 1 or leadqualitycode eq 2

8. Contains with ‘AND’ on same  text field

Filter query= contains(textfield1name,’value1′) and contains(textfield1name,’value2′)

e.g. if I have to filter where ‘Topic’  contains ‘New’ and ‘Interested’; my filter would be contains(subject,’new’) and contains(subject,’interested’)

9.Filter an option set checking two or more values

Filter query= optionsetfieldname1 eq optionsetnumericvalue1 or optionsetfieldname1 eq optionsetnumericvalue2

e.g. if I have to filter where ‘Rating’  contains either ‘Hot’ or ‘Warm’ data; my filter would be leadqualitycode eq 1 or leadqualitycode eq 2

Screen Shot 2019-11-16 at 1.16.25 pm.png

10. Filter by checking two different option sets

Filter query= optionsetfieldname1 eq optionsetnumericvalue1 or optionsetfieldname2 eq optionsetnumericvalue2

e.g. if I have to filter leads where ‘Rating’  contains ‘Hot’ and  ‘Lead Source’ contains ‘Advertisement’; my filter would be leadqualitycode eq 1 and leadsourcecode eq 1

Screen Shot 2019-11-16 at 1.17.15 pm

11.Starts with/Begins with

This is for text fields only

Filter query=startswith(fieldname,’startvalue’)

e.g. if I have to filter all Australian leads , I will look at ‘Business Phone’ starts with country code +61; my filter would be startswith(telephone1,’+61′)

e.g. if I have to filter leads from  Australia or New Zealand, I will look at ‘Business Phone’ starts with country code +61 or +64; my filter would be startswith(telephone1,’+61′) or startswith(telephone1,’+64′)

e.g. if I have to filter leads having ‘Business Phone’  from Australia but ‘Mobile Phone’ from New Zealand, I will look at ‘Business Phone’ starts with country code +61 and +64; my filter would be startswith(telephone1,’+61′) and startswith(mobilephone,’+64′)

12.Ends with

This is for text fields only

Filter query=endswith(fieldname,’endvalue’)

e.g. if I have to filter all leads where ‘Website’ ends with ‘.org’; my filter would be endswith(websiteurl,’org’)

e.g. if I have to filter all leads where ‘Website’ either ends with ‘.org’ or ‘.com’; my filter would be endswith(websiteurl,’org’) or endswith(websiteurl,’com’)

e.g. if I have to filter all leads where ‘Website’ ends with ‘.org’ and email ends with ‘.com’; my filter would be endswith(websiteurl,’org’) and endswith(emailaddress1,’com’)

13.Greater than

This is for Numbers and date fields only

Filter query=datefield gt ‘specificdate’

Filter query=datetimefield gt ‘specificdatetime’

Filter query=numberfield gt specificnumber              (No, ” here)

e.g. if I have to filter leads created after 10th August 2019

createdon gt ’10/08/2019′

e.g. if I have to filter leads created after 5AM on 10th August 2019; my filter would be

createdon gt ’10/08/2019 05:00′

e.g. if I have to filter leads created after 5:30AM on 10th August 2019; my filter would be

createdon gt ’10/08/2019 05:30′

Screen Shot 2019-11-16 at 1.18.15 pm.png

e.g. if I have to filter leads created after 5PM on 10th August 2019; my filter would be

createdon gt ’10/08/2019 17:00′

e.g.if I have to filter leads created after 5:30PM on 10th August 2019; my filter would be

createdon gt ’10/08/2019 17:30′

e.g. if I have to filter leads where annual revenue is more than $2000000

revenue gt 2000000 

e.g. if I have to filter leads where annual revenue is more than $2000000 and number of employees is more than 500

revenue gt 2000000 and numberofemployees gt 500

Screen Shot 2019-11-16 at 1.12.15 pm

14.Less than

This is for Numbers and date fields only

Filter query=datefield lt ‘specificdate’

Filter query=datetimefield lt ‘specificdatetime’

Filter query=numberfield lt specificnumber              (No, ” here)

e.g. if I have to filter leads created before 10th August 2019

createdon lt ’10/08/2019′

e.g. if I have to filter leads created before 5AM on 10th August 2019; my filter would be

createdon lt ’10/08/2019 05:00′

e.g. if I have to filter leads created before 5:30AM on 10th August 2019; my filter would be

createdon lt ’10/08/2019 05:30′

e.g. if I have to filter leads created before 5PM on 10th August 2019; my filter would be

createdon lt ’10/08/2019 17:00′

e.g.if I have to filter leads created before 5:30PM on 10th August 2019; my filter would be

createdon lt ’10/08/2019 17:30′

e.g. if I have to filter leads where annual revenue is less than $2000000

revenue lt 2000000 

e.g. if I have to filter leads where annual revenue is less than $2000000 and number of employees is less than 500

revenue lt 2000000 and numberofemployees lt 500

15.Less than or equal to and Greater than or equal to

This is for Numbers and date fields only

Filter query=datefield ge ‘specificdate’

Filter query=datetimefield ge ‘specificdatetime’

Filter query=numberfield ge specificnumber              (No, ” here)

Filter query=datefield lt ‘specificdate’

Filter query=datetimefield le ‘specificdatetime’

Filter query=numberfield le specificnumber              (No, ” here)

e.g. if I have to filter leads created after or on 10th August 2019

createdon ge ’10/08/2019′

e.g. if I have to filter leads created after or at 5AM on 10th August 2019; my filter would be

createdon ge ’10/08/2019 05:00′

e.g. if I have to filter leads created after or at 5:30AM on 10th August 2019; my filter would be

createdon ge ’10/08/2019 05:30′

e.g. if I have to filter leads created after or at 5PM on 10th August 2019; my filter would be

createdon ge ’10/08/2019 17:00′

e.g.if I have to filter leads created after or at 5:30PM on 10th August 2019; my filter would be

createdon ge ’10/08/2019 17:30′

e.g. if I have to filter leads where annual revenue is more than or equal to $2000000

revenue ge 2000000 

e.g. if I have to filter leads where annual revenue is more than or equal to $2000000 and number of employees is more than or equal to 500

revenue ge 2000000 and numberofemployees ge 500

e.g. if I have to filter leads created before or on 10th August 2019

createdon le ’10/08/2019′

e.g. if I have to filter leads created before or at 5AM on 10th August 2019; my filter would be

createdon le ’10/08/2019 05:00′

e.g. if I have to filter leads created before or at 5:30AM on 10th August 2019; my filter would be

createdon le ’10/08/2019 05:30′

e.g. if I have to filter leads created before or at 5PM on 10th August 2019; my filter would be

createdon ge ’10/08/2019 17:00′

e.g.if I have to filter leads created before or at 5:30PM on 10th August 2019; my filter would be

createdon ge ’10/08/2019 17:30′

e.g. if I have to filter leads where annual revenue is less than or equal to $2000000

revenue ge 2000000 

e.g. if I have to filter leads where annual revenue is less than or equal to $2000000 and number of employees is less than or equal to 500

revenue le ‘2000000’ and numberofemployees le 500

e.g. if I have to filter leads where annual revenue is less than or equal to $2000000 and number of employees is more than or equal to 500

revenue le ‘2000000’ and numberofemployees ge 500

Filter array

These are very much similar to what we get in D365 native workflows except for puttin the value ourselves.

1.Option set label

Select the label field dynamically and not the value field. Then specify your label value on the right.

Screen Shot 2019-11-16 at 1.25.11 pm

Screen Shot 2019-11-16 at 1.24.00 pm

2. Option set value

Select the value field dynamically and not the label field. Then specify your option set value on the right.

Screen Shot 2019-11-16 at 1.29.06 pm

3. Text fields

This one is for text fields like Topic, Subject, Phone, City, Street 1 etc.

Screen Shot 2019-11-16 at 1.30.32 pm.png

4. Number and date fields

This is for number and date fields.

Screen Shot 2019-11-16 at 1.32.31 pm.png

Screen Shot 2019-11-16 at 1.33.25 pm.png

Those are enough filters to get you started. 🙂

Hope you find this helpful!

Subscribe to my YouTube

Thanks!

Let’s keep sharing!