Category: MS CRM

Small but useful features Dynamics 365 V9

Multiselect Option Set

You can read about it here: http://dynamicscrmcoe.com/dynamics-365-v9-multi-select-option-set/

But how to import data with multiselect option set is a question and below is the answer:

Taking example of contacts with preferred car, following is a table on how to do it:

Correct format

Sample first Name Sample Last Name Email Mobile Preferred Car
Joe H Joe.h@sample.com +61 467891234 Honda; BMW; Toyota
Andrew Ly Andrew.ly@sample.com +61 467891235 Audi; BMW; Tesla

So, the key is to separate the values by a “;” + space

Incorrect format

Sample first Name Sample Last Name Email Mobile Preferred Car
Joe H Joe.h@sample.com +61 467891234 Honda, BMW;Toyota
Andrew Ly Andrew.ly@sample.com +61 467891235 Audi BMW Tesla

Text Wrap

This is a good one, as now the fields with big labels can be displayed in full J

Currently if we have long text labels, we can’t see the whole text and we must hover as shown below:

1

But if we enable the text wrap settings then we can see the whole text here, as shown below:

2

How to enable the settings? Go to Settings>>Administration>>System Settings>>General Tab>>First Option>>select Yes and click OK

3

Inactivity Timeout

You can now set inactivity timeout for a session along with a warning.

Go to settings>>Administration>>System Settings>>General Tab>>Scroll down>>enter your duration and click OK (as shown in the screenshot below)


4

Hope you find this helpful.

Happy CRMing !

USING SITE MAP DESIGNER IN DYNAMICS 365

Hello Readers,

I am glad that Dynamics 365 is making things easier for people with no technical background; here’s one such useful thing 🙂

Navigate to new Site Map Designer

Go to Settings>>Customisations

1

Click on ‘Customise the System’

2

Navigate to Client Extensions>>Site Map

3

Double click to open the Site Map

4

Area, Group and Subarea

This is explained in the screenshot below:

5

Adding a component

There are two ways of doing it:

1.Click on the add button on top

6

2.Click on the respective components on right

7

Let’s try and add each of the component type

Drag ‘Area’ from components window at the right and drop it just before ‘Sales’

8

Let’s give it a name by clicking on pencil icon, which you can see when you hover over the new area. After that I am placing a group and subarea under it.

9

Click on save and then publish:

10

This is how it looks now:

11

There are four different types of Subarea:

  • Entity
  • Dashboard
  • URL
  • Web Resource

All of them works fine except URL, I have used google.com.au as my URL with an expectation that it will load google within my CRM (well, I was wrong); to do that you need to add a web resource component otherwise you will see a blank screen. However, if you right click and open in a new window, it works fine.

12

So no more XRMToolBox, you can edit your sitemap from within Dynamics 365 🙂

Hope you find this helpful.

Happy CRMing !

Project Service Automation- Form Load Issues

Hello Readers

——Quick One—-

As we all know, Project Service Automation module is one of the best add on for MS CRM, for any IT/ITES or Project based organization, in order to deal with Project Contract and Quotations etc. However, with the launch of Dynamics 365, there are some issues currently going on with it.

Issue1: When you add quote to an opportunity, Quote form- Project information changes to the default quote form, which makes it difficult to enter/view Project Details. Project Information form is loaded for few seconds and then quote default form is loaded back.

Issue 2: Moreover, Quote-Project Information page has ‘Project Based Lines’ hidden, so you can’t edit them on the quote form

Solution 1 for Issue 1: When on opportunity form, make sure that you switch to/default Opportunity-Project Information form and not others. Now when you add a quote, it will jump to Quote-Project information form. It works for me, but for many it might not work and they need to check Solution 2 for Issue 1.

Solution 2 for Issue 1: Make a copy of both default Quote form and Quote-Project information form. Now, deactivate earlier versions of both the forms. Set the Project information form as default and do rearrange the order of the form.

1

Solution for Issue 2: Set visible as default for Project based lines sub grid. Go to settings>>customization>>customize the system>>Entity>>Quote>>Forms>>New Quote-Project information form>>Double Click- Quote Lines Tab and set visible as default; Hide the Product based lines sub grid.

2

Hope it resolves your issue…

Happy CRMing !

Deal with Dynamics CRM Online Like a Pro

Hello Readers,

In this blog, I have tried to include useful tips for MS CRM Online. Most of the times, we are not aware of them and we end up raising a ticket to Microsoft.

You can download the tool here: https://orgdborgsettings.codeplex.com/

It is on codeplex and is supported by Microsoft.

Tested Version: MS CRM 2011, 2013, 2015 & 2016 (not Dynamics 365)

keep-calm-and-do-it-like-a-pro-5

Increase Export to Excel Record limit

For MS CRM Online the OOB limit is 10,000 records. You can increase it to any number but my personal opinion is don’t set it over 50,000 as it then starts throwing SQL Timeout error. Go to OrgDBOrgSettings and set MaxRecordsExporttoExcel and change the limit to 50,000 or less

Do not create contacts on email tracking

We know how easy it is to achieve but on an individual user level. But when it comes to MS CRM Online, we just get short of ideas on How to bulk update all users personal options. Well it’s much more easy than we thought. Go to OrgDBOrgSettings and set AutoCreateContactOnPromote as FALSE

Select your error notification preference

Go to OrgDBOrgSettings and set ClientUEIPDisabled as FALSE, this will disable the ‘send error report’ pop up which annoys all the users J

Sharepoint Folder Nomenclature

When you integrate MS CRM & MS Sharepoint, the folder name for each record of CRM in Sharepoint will have a nomenclature like Name+GUID, but to our users it does not look good. Here’s a simple trick to make your folders appear just by Name and not Name+GUID. Go to OrgDBOrgSettings and set CreateSPFoldersUsingNameandGuid as FALSE

Implicit Sharing

Read more about it here: http://blog.dorrekens.com/index.php/list/165-on-implicit-sharing-team-ownership-and-reparenting

You can disable it by changing DisableImplicitSharingOfCommunicationActivities to TRUE

Customise the Alphabet filter on any Grid/List view

It is linked to JumpBarAlphabetOverride; Read https://support.microsoft.com/en-gb/help/2494984/how-to-customize-the-alphabet-bar-for-the-crm-application-grids-for-microsoft-dynamics-crm-4.0 for more information

Change default entity for Regarding Lookup

Change SetRegardingLookupDefaultEntityType to contact and now Regarding will default to Contacts Lookup view. Here: https://bhattketan.wordpress.com/2015/12/07/change-default-lookup-setregardinglookupdefaultentitytype/

Sort Email on Social Pane

Currently, Emails are sorted by Modified on (Descending), you can change it Received on (Descending) by SortEmailByReceivedOn to TRUE

Get information about related KBs here https://support.microsoft.com/en-gb/help/2691237/orgdborgsettings-tool-for-microsoft-dynamics-crm

Hope you find it helpful..

Happy CRMing !

Business Process Flows in Dynamics 365-Part II

This is in continuation of the topic ‘Business Process Flows in Dynamics 365-Part I

Now let’s see, how does Business Process Flows looks on CRM forms:

Colours have changed 🙂

I am in the second stage and have selected ‘Project type’ equals “Implementation”

18

I am in the second stage and have selected ‘Project type’ equals “Support”

19

Many a times, my clients have asked me about the ‘timer’; user must be able to see ‘How much time they have spent in current stage?’; No worries! here it is 🙂

20

You even get to see ‘Total time spent in this process’, cool that! 🙂

21

Icons have changed for next and previous stage button

Previous Stage  22   Next Stage

Just in case the process flow is irritating you, click on hide hide

A new button for multiple actions on Business Process Flows is introduced, called ‘Process

24

Click on that and you see, Switch Process, Edit Process & Abandon Process

We must be aware about Switch Process and Edit Process because of the availability in previous versions, if not:

Switch Process: it helps you to switch between multiple Business Process Flows, enabled for any entity at a given point of time. Basically, if you have multiple process flows which are not automated based on form type or any field and by mistake you started working on an irrelevant flow, you can switch process

Automating Switch Process Flows: (Refer this) https://community.dynamics.com/crm/b/develop1/archive/2013/09/20/how-to-change-process-and-stage-programmatically

Edit Process: All users will not be able to see this option as this requires specific privileges, usually with System Admin. This feature helps you in modifying your Business process flow, right from the record level instead of going to>>settings>>processes; you can edit it from here

Abandon: Coolest of all J Abandon process will stop your process flows time, then and there. It even turns the process in to grey (deactivate) for this particular record. You can either switch to other process or reactivate this later.

25

Abandoned processes will be archived and can be reactivated, if required.

Hope you find this post useful!

Drop your questions & suggestions in the comment box below.

Thank you for reading!

Happy CRMing!!


Business Process Flows in Dynamics 365-Part I

Business Process Flows have been an integral part of Dynamics CRM since version 2013.

We should use Business Process Flows, if we want Users to follow same set of activities while executing a sales or service process (or may be a defined type of sales or service) while interacting with clients.

What’s new??

  • Designer
  • Trigger a workflow

Designer

Major UI Changes in the Business process flow designer. Much simpler, visio like experience and that’s why its lot easier for non-technical people to design and understand.

16

Finally, drag and drop is here in the process designer. It’s as quick as a MS Visio diagram; once you understand it J

You can drag & drop conditions, stages, steps and workflows

Take note of the points mentioned in the below URL, while designing:

https://technet.microsoft.com/en-us/library/dn887193.aspx?f=255&MSPPError=-2147217396#Points

You can connect a condition to a stage

You can take a screenshot by clicking on ‘snapshot’

You can cut, copy and paste; the steps, stages and conditions. how cool is that? J


A workflow can be triggered on entry or exit of any stage. The workflow must be on the entity, for which this stage is created.

Enough of blabbering, now let’s see how we can create a Business process flow, with all the above mentioned charms.

Scenario: We will create a flow for Sales Team; working on both Implementation and Support Projects. I am going to include 4 unique entities in my flow (max. limit is 5)

  • 2 Stages on Lead
  • 1 on Opportunity
  • 1 on Quote
  • 1 on Order

Go to settings>>Processes>>New

1

As you can see, it can also be run as a ‘Task flow’ for mobile clients. For more info, check this https://rajeevpentyala.com/2016/04/16/task-flow-crm-2016/

As soon as you hit ‘OK’, following screen will pop up:

2

On your right, you have drag & drop options:

As you can see in the screenshot below, there are four components-

3

Let’s start with adding stages, drag stage to the designer

Give it a name and click apply
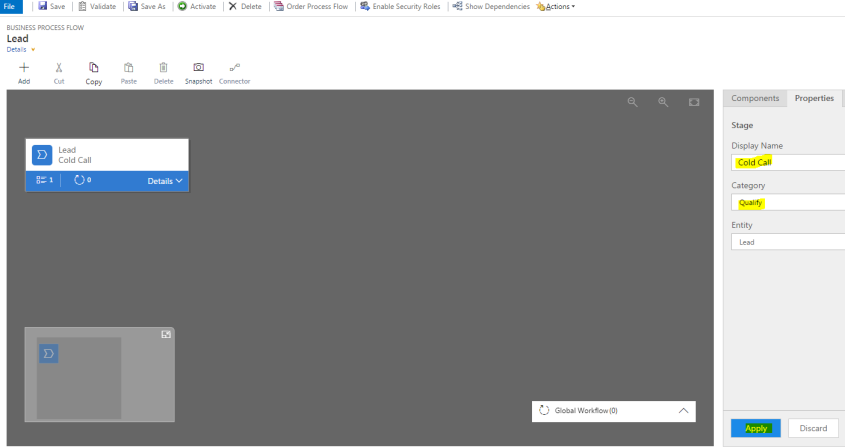
4

Add steps to this stage, by clicking either on ‘details’ or ‘+Add’ button

On your right, you will see filed options to select from (make them required on your wish)

you can also define the sequence, from the Properties panel on the right
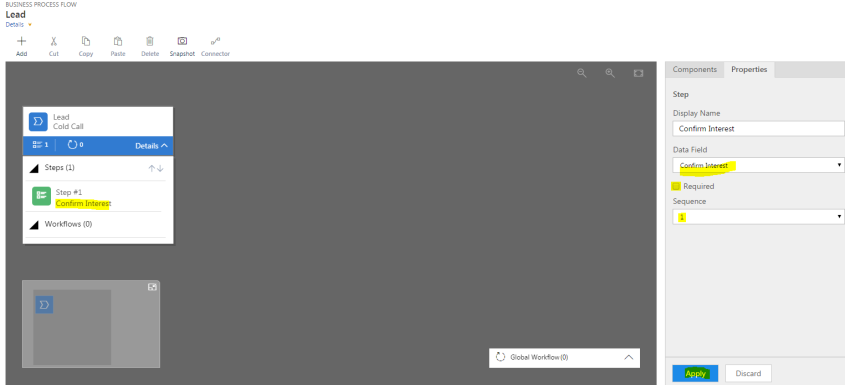
7

Add the second stage of Lead, I have custom field on Lead, ‘Project type’ having options; Implementation and support

8

It is mandatory to have your condition field on the stage from where you want conditions to evolve.

So now, I am going to add conditions (You can add Yes/No conditions as well); these are very similar to ‘Branch’ which we used to have in the previous versions of CRM


If ‘Project Type’ equals Implementation

9

If ‘Project Type’ equals Support

10

What I want to achieve here is, If ‘Project type’ is implementation, next stage must be DEMO otherwise, it should be TAILOR SUPPORT PLAN

11

Adding another stage now and merging the two opportunity stages to the next one

12

Click on stage ‘Test Support Plan’ and then click on connector

13

Click on ‘connect’ to see first and second point of this condition

14

Now click on 2nd point, to establish a branch

15

Adding the last stage ‘Place Order’, my process flow looks like:

16

Workflows can be added at any stage entry or exit. Keep in mind that the workflow must be related to the stage entity and an on-demand workflow:

17

Hope you find this post useful!

Drop your questions & suggestions in the comment box below.

Thank you for reading!

Happy CRMing!!


Creating Business Process Flows in CRM 2013

Hello All,

Today I will share my thoughts on creating Business Process Flows(BPF)in CRM 2013.

First of all, let me set the context right….

BPFs are nothing but an automated replacement for your Sales pipeline; which we used to update through workflows under pipeline phase field in CRM 2011 or through customization. But now it can be automated with the help of BPFs.

How to create: Go to settings>> Processes

Click on new and select category of process as Business process flow. Now select the entity (Lead, Account, opportunity and cases in some scenarios). By default it is available for few entities rather transactional entities related to sales and case entity.

Image

Is it available for custom entities: Yes it is. while creating an entity checkmark ‘Business Process flow’

Image

Can we create a single BPF for two entities: Yes you can, you can add by clicking on +/- button

Image

Can we have multiple stages: Yes you can have as many stages as you want; but always keep in mind that if there are too many stages (more than 5)  it might be a difficult UI for users.

Can i add fields associated to stages: Yes you can add fields associated to stages and mark them as required as well; if you wish that without filling these fields user should not be able to move to next stages.

Image

Can i have different sales stages for different sales members: yes you can define via security roles. You can select which security role people to access which sales stages.

Image

Happy CRMing !!