Category: Quick Tips

Plot Multiple Map Points In Power Apps (Canvas Apps) with Dynamic Filters

Hi Everyone

In this vlog we will see how to see multiple points/pushpins on a map in canvas app. As always, this is a no code solution and fairly basic.

I have came across this requirement so many times in Dynamics 365 for e.g. show all customers on a map or contacts on a map or even appointments on a map. Many solutions are available for Dynamics 365 CE including add ons like Maplytics. But for canvas app, following issues persists:

  • No map components
  • Static bing/google maps can be inserted by inserting an image and then providing URL
  • Bing or Google maps API is required
  • Hard code latitude and longitude
  • If you want to show more than one push pin, you need to hard code all coordinates
  • You can’t apply dynamic filters on your maps

To me all of the above are not easy to use solution and that’s why I decided to look for something which all our #nocodemonkeys can use. This can be the fastest way you can plot all your customers on a map within canvas apps.

Prerequisites:

  • Access to Power Apps
  • Access to Power BI (Desktop and Web)
  • Super Basic Knowledge of how to create a chart/report in Power BI
  • Basic understanding of Power Apps formulas
  • Entity (accounts/contacts/appointments) must have Latitude and Longitude filled (otherwise it won’t be shown on maps

Note: You can get latitude and longitude by create a flow in Power Automate

Step 1-7 for Power BI and Step 8-12 Power Apps

Step 1: Go to your Power BI Desktop>>Create a connection>>Get data (e.g. Accounts)

Step 2: Once your data is loaded>>click on report icon and then add the visualisation type as shown below:

Step 3: Add data fields

Step 4: Save your Power BI report by clicking on the disk button on top left

Step 5: Login to Power BI web https://app.powerbi.com/

Step 6: Click on ‘Workspace’ in the left navigation and then click reports (this is where you can find the report you created in above steps)

Step 7: Click on the report to open and then click pin visual

Step 8: Login to Power Apps https://make.powerapps.com/ and pick your existing app or create a new canvas app

Step 9: Click Insert then ‘Power BI tile’

Step 10: Select Workspace, Dashboard and Tile

Dynamic Filtering- Step 11 & 12

Step 11: Apply dynamic filtering by adding new components like Text Input or Drop Downs. In my case, I have two drop downs and one text input; names below:

StateDropDown- With 5 values (you can have any values here)

CityDropDown-With 5 values (you can have any values here)

txtPostCode- Text input for ZIP/Postal Code

Step 12: Update the ‘TileURL’ of Power BI tile. Use the following sub-steps based on how many filters you need as it can go to Nth level (I am only showing three)

12a. One field filter

“Power BI TileURL” & If(!IsBlank(txtPostCode.Text),
“&$filter=accounts/address1_postalcode eq ‘” & txtPostCode.Text & “‘”)

12b. Two fields filter

“Power BI TileURL” & If(!IsBlank(txtPostCode.Text),
“&$filter=accounts/address1_postalcode eq ‘” & txtPostCode.Text & “‘”,
!IsBlank(CityDropdown.SelectedText.Value),
“&$filter=accounts/address1_city eq ‘” & CityDropdown.SelectedText.Value & “‘”)

12c. Three fields filter

https://app.powerbi.com/embed?dashboardId=ed06a838-8b0f-4445-a582-1890699df2d3&tileId=401efbc1-2194-4807-a07e-7e89567e49ce&config=eyJjbHVzdGVyVXJsIjoiaHR0cHM6Ly9XQUJJLUFVU1RSQUxJQS1FQVNULUEtUFJJTUFSWS1yZWRpcmVjdC5hbmFseXNpcy53aW5kb3dzLm5ldCJ9” & If(
!IsBlank(txtPostCode.Text),
“&$filter=accounts/address1_postalcode eq ‘” & txtPostCode.Text & “‘”,
!IsBlank(CityDropdown.SelectedText.Value),
“&$filter=accounts/address1_city eq ‘” & CityDropdown.SelectedText.Value & “‘”,
!IsBlank(StateDropdown.SelectedText.Value),
“&$filter=accounts/address1_stateorprovince eq ‘” & StateDropdown.SelectedText.Value & “‘”
)

Note: Screenshot below for better understanding

Result after dynamic filters

Video here:

Hope it helps!

Subscribe to my channel and follow my blog.

Thanks!

Let’s keep sharing!

How to fix the subgrid in Dynamics 365 UI?

Hello Readers

This blog is part of my quick tip series and will be short.

if you’re struggling with the responsive subgrid in Dynamics 365 and want to permanently fix it, regardless of the screen resolution/zoom or device; here’s the solution:

Look at the problem first-

Sub-grid 1-You see a sub-grid like this:

1

Sub-grid 2-And it changes to this when you zoom out or change the resolution:

2.png

So how can you make sub-grid 2 appear all the time?

Step 1:Go to advanced settings

3.png

Step 2:Customisations or solutions depending on the need

Step 3:Entity>>Form

Step 4:Double click the sub-grid on the form

Step 5:Click controls

Step 6: Select ” as a control

Step 7: Select ‘Grid only’ under “Reflow behaviour”

4

Step 8: Save and then publish

Hope it helps!

Subscribe to my channel and follow my blog.

Thanks!

Let’s keep sharing!

#TGIF Quick Tip on UI Flows (Power Automate, renaming a UI flow)

Hello Readers

This quick tip is part of my Thank God it’s Flow #TGIF series. There are two tips in this post:

  1. Renaming your UI flow
  2. Modifying and removing connections

Renaming your UI Flow: For general flows you just hit on the pencil/edit button and can rename them by clicking on the name at the top as shown below:

Screen Shot 2019-12-08 at 1.41.09 pm.png

This doesn’t work for UI Flows. Instead you have to click on the name and the click the edit button shown in the screenshot below:

Screen Shot 2019-12-08 at 1.35.17 pm.png

Modifying and removing connections: 

All connections are available under Data on the left navigation. So if you reach maximum connection limit and are thinking how to delete/remove one. Here is the place. Just click on the ellipses (…) and select an option

Screen Shot 2019-12-08 at 1.36.42 pm.png

Hope it helps!

Subscribe to my channel and follow my blog.

Thanks!

Let’s keep sharing!

Everything you need, to run a UI Flow (Power Automate)

Hello Readers

In this post I will take you through the setup required to run a UI Flow (Robotic Process Automation) RPA. Now you might not need it if you running your flow manually and it is not triggered by a button, event etc.

Step 1: Log on to flow.microsoft.com

Screen Shot 2019-12-08 at 12.11.41 pm.png

Step 2: Go to My Flows>>UI Flows (tab)

Screen Shot 2019-12-08 at 12.12.20 pm.png

Step 3: Get a CDS subscription

If you don’t have a CDS subscription yet, you need to get it to be able to create UI flows.

Step 4: Once you’ve got the CDS subscription, you will be able to create a UI flow by clicking on ‘+New’ at the top or ‘Create a UI Flow’ at the bottom of your screen.

Screen Shot 2019-12-08 at 12.16.33 pm.png

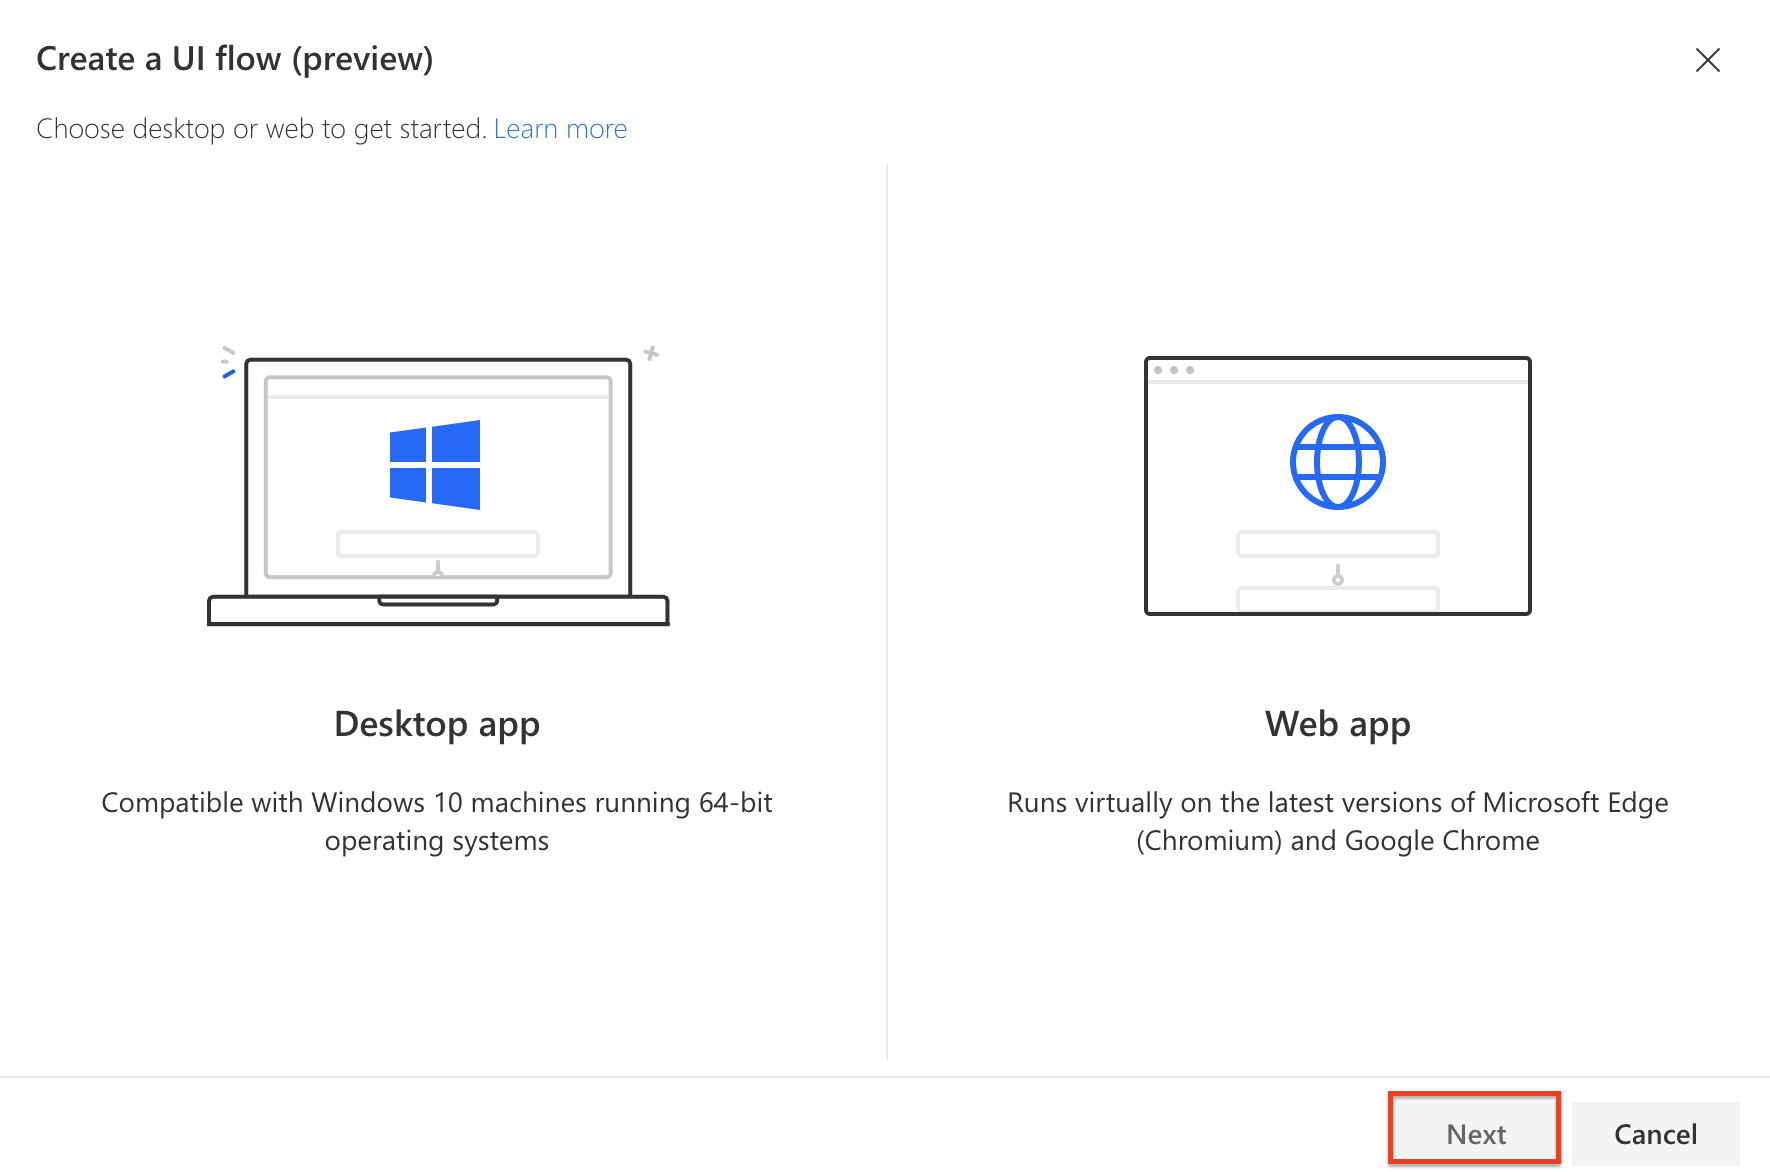
Step 5: Select an app to create your UI Flow. There are two types of app present, you can select based on what you want to automate.

Desktop App: Example- if I want to automate customer creation in MYOB AccountRight (Accounting Application)

Web App: Example- if I want to automate account creation in Dynamics 365 Customer Engagement

Select your UI app and click ‘Next’

Screen Shot 2019-12-08 at 12.23.41 pm

Step 6: Download the UI Flows Installer and run it

6a. UI flow installer here https://go.microsoft.com/fwlink/?linkid=2102613

6b. Activate UI flow browser extension

6c. Install Selenium IDE https://go.microsoft.com/fwlink/?linkid=2107665

That’s all you need to get started.

Note: The above steps are complete if you are running UI flow manually every time

Run a UI flow from a button, business process flow or an event

To do this, you will have to follow additional set up steps:

Note: This would differ based on which app you’ve selected desktop or web but you would not need any other steps than the one mentioned below. For web app, you will be asked to select a browser from Edge chromium or google chrome.

Step 7: Create another Flow from which you want to trigger UI flow (or include Ui flow as a step in there)

Step 8: Connection

When you add the UI flow step, you will be asked about connection with following attributes:

Connection name: Name it anything logical

Username: “domain/name” this is the username of your machine/laptop. Just in case you’re using a personal laptop and don’t know about your domain name or username, you can check it by going windows start button and type cmd. Next type %username%

Screen Shot 2019-12-08 at 12.52.55 pm.png

Password: This is your machine’s/laptops password

Gateway: Click on new gateway if you’ve not created one yet and move to Step 9.

Screen Shot 2019-12-08 at 12.59.48 pm.png

Step 9: Install On-premise data gateway https://docs.microsoft.com/en-gb/data-integration/gateway/service-gateway-update?WT.mc_id=BA-MVP-5003605

Email, username and password while setting this up would be the same which you used to login to flow.microsoft.com (in most cases). This will establish your connection with azure

Make sure that assign permissions  to ‘NT Service\PBIEgwService’  for this folder/path C:\Windows\ServiceProfiles\PBIEgwService\Documents\Power BI Desktop\Custom Connectors

Screen Shot 2019-12-08 at 12.45.04 pm

As of today, that’s all you need to run a UI flow. This feature is still in preview so please expect enhancements and changes.

If you want to see how to make a UI Flow, please stay tuned as I will release a video soon.

Hope it helps!

Subscribe to my channel and follow my blog.

Thanks!

Let’s keep sharing!

Populating ‘Item Link’ In Approvals (Power Automate/MS Flow)

Hi Readers

This is a quick tip on how to generate a link to the item you want to be approved.

Scenario: Whenever a quote is created a approval request must be sent out with a link/URL of quote to be approved.

Problem: “Item Link” field only shows the GUID of the quote

There’s no URL field for selection so you select the Unique Identifier of the quote, thinking it might work.
Approval looks like this so you can’t go to the actual item from here.

Solution: Combine the URL of your model driven app (prefix) and record GUID (suffix)

Model driven app’s URL and unique identifier of quote/record. This works.
This is how your approval form looks, click on the link to check the actual approval item/record.

Hope it helps!

Subscribe to my channel and follow my blog.

Thanks!

Let’s keep sharing!

Using Timer Control In PowerApps (with problem scenarios and Business use cases)

Hello Readers and Viewers

This blog/video is part of my quick tip series. We are going to look at how we can force a screen to be visible to a user irrespective of the transition, in other words delay screen transition.

Skip to the video, if you don’t want to read

Example Problem 1: if we want to Navigate to more than one screen back to back only the last screen mentioned in navigate formula is visible to the user; that means one navigate screen is skipped. for e.g. look at the formula below:

Select(Parent);SubmitForm(checkinform_1);ResetForm(checkinform_1);Navigate(Success,ScreenTransition.Fade);Navigate(lstMembers)

If you apply the above formula to your Power Apps, users will always end up seeing “Navigate(lstMembers)” and the success screen is skipped.

Example Problem 2: if we remove the last bit of the formula and have only one ‘navigate’ as shown below:

Select(Parent);SubmitForm(checkinform_1);ResetForm(checkinform_1);Navigate(Success,ScreenTransition.Fade)

if you apply the above formula, users will have to touch on the success screen somewhere to be able to see any other screen. (assuming success button in below screen will have navigate formula)

b1

Solution to both the example problems: First of all remove the last navigate from the formula and only have one navigate, shown below:

Select(Parent);SubmitForm(checkinform_1);ResetForm(checkinform_1);Navigate(Success,ScreenTransition.Fade)

Note: I am not saying you must use the exact same formula as above, you need to change the formula as per your need but only have one navigate in the formula.

Now on your success screen add a timer by going to Insert>>Input>>Timer

b2.JPG

Set AutoStart to true

Set the duration of the timer by clicking on the timer on screen (Completely on your requirements, for how long you want a user to see a screen)

1000=1 second 5000=5 seconds 30000=30 seconds

Set OnSelect to false

b3b4b5

Set the second navigation on your ‘TimerEnd’ property

b6

Now hide the timer, so your users can’t see it

b7

And all done, your users will now be navigated to the screen of choice without having to click anywhere.

Business Use Case: You want your users to see a success screen for ‘n’ seconds and then auto-redirect to a list or another form.

Video here:

Let me know your thoughts!

Subscribe to my channel and follow my blog.

Thanks!

Let’s keep sharing!

How To Customise Microsoft Forms Pro Theme? (MS FormsPro)

Hi Guys

This video is part of my quick tip series. In this video we will see the following:
1. Changing theme in Forms Pro
2. How to create custom theme for Forms Pro (with dimensions)?
3. Change colour of the Survey header based on the custom theme
4. Where to get Hex colour codes?

Here’s the video:

Hope it helps!

Colour website: https://htmlcolorcodes.com/

For more such videos subscribe to my channel and follow my blog.

How to change the name of your PowerApps? (Renaming your app)

Hi Guys

In this video we are looking at a quick tip; that tells us how to change the name of your PowerApps. You must have seen the error if you’ve tried to change the name from the screen when you are editing an app.

For more PowerApps tips and tricks, subscribe to my channel and follow my blog.

Here’s the video:

Thanks for reading and watching.

Hope it helps!

Do not create a lead or a contact in Dynamics 365 before you try the Business Card Scanner…

Hi Readers and Viewers

This video is just to show you the ‘Business Card Scanner’ functionality, coming up in Wave 2 release. This was available with AI Builder in canvas apps but with wave 2 we will get this within Dynamics 365.

Note: it’s currently only available for US and EU instances.

Hope it helps!

Happy CRMing!

How To Use The Invisible ‘Embed Media’ Button On Knowledge Articles To Insert A YouTube Video

Hello Readers and Viewers

In this video I will show you how to embed media in a Knowledge Article. This doesn’t require you to know HTML. (Another No code solution).

Here’s the invisible ‘Embed Media’ button:

Screen Shot 2019-08-10 at 4.16.48 pm.png

Here’s the video for you.

Hope it helps!

Happy CRMing Guys!