Tag: robotic process automation

How to fix the subgrid in Dynamics 365 UI?

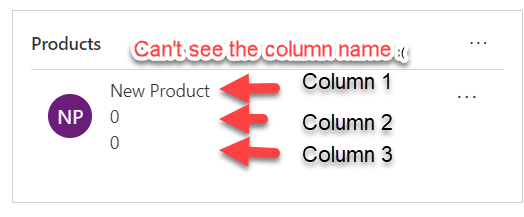
Hello Readers

This blog is part of my quick tip series and will be short.

if you’re struggling with the responsive subgrid in Dynamics 365 and want to permanently fix it, regardless of the screen resolution/zoom or device; here’s the solution:

Look at the problem first-

Sub-grid 1-You see a sub-grid like this:

1

Sub-grid 2-And it changes to this when you zoom out or change the resolution:

2.png

So how can you make sub-grid 2 appear all the time?

Step 1:Go to advanced settings

3.png

Step 2:Customisations or solutions depending on the need

Step 3:Entity>>Form

Step 4:Double click the sub-grid on the form

Step 5:Click controls

Step 6: Select ” as a control

Step 7: Select ‘Grid only’ under “Reflow behaviour”

4

Step 8: Save and then publish

Hope it helps!

Subscribe to my channel and follow my blog.

Thanks!

Let’s keep sharing!

#TGIF Episode 6: UI Flows (RPA) in Power Automate (Both desktop & web app)

Hello Readers and Viewers

In this episode we will learn about the business use cases of robotic process automation or UI Flows. If you want to learn about setting up UI flows, please read this post https://diyd365.com/2019/12/11/everything-you-need-to-run-a-ui-flow-power-automate

We will look at both desktop and web app.

I have taken two business scenarios:

  1. Automation Testing of Dynamics 365– As a functional consultant and business user, we always perform unit testing manually. So I will demonstrate a scenario where we can automate it with the help of UI Flows. Our test scenario is; As a salesperson, I must be able to login to MS Dynamics 365 with office credentials and be able to create a customer/account.
  2. MYOB AccountRight integration with Dynamics 365– As a functional consultant and business user I don’t know a straight forward integration between MYOB and Dynamics 365. So I will demonstrate that whenever you create an invoice in Dynamics 365, UI Flow will create a customer and then invoice in MYOB AccountRight.

Video here:

I hope both my scenarios add some value to your business and daily work life. You can obviously extend it to any level.

Fundraising for Rural Aid Australia- TGIF Shirts, here.

Let me know your thoughts!

Subscribe to my channel and follow my blog.

Thanks!

Let’s keep sharing!


Everything you need, to run a UI Flow (Power Automate)

Hello Readers

In this post I will take you through the setup required to run a UI Flow (Robotic Process Automation) RPA. Now you might not need it if you running your flow manually and it is not triggered by a button, event etc.

Step 1: Log on to flow.microsoft.com

Screen Shot 2019-12-08 at 12.11.41 pm.png

Step 2: Go to My Flows>>UI Flows (tab)

Screen Shot 2019-12-08 at 12.12.20 pm.png

Step 3: Get a CDS subscription

If you don’t have a CDS subscription yet, you need to get it to be able to create UI flows.

Step 4: Once you’ve got the CDS subscription, you will be able to create a UI flow by clicking on ‘+New’ at the top or ‘Create a UI Flow’ at the bottom of your screen.

Screen Shot 2019-12-08 at 12.16.33 pm.png

Step 5: Select an app to create your UI Flow. There are two types of app present, you can select based on what you want to automate.

Desktop App: Example- if I want to automate customer creation in MYOB AccountRight (Accounting Application)

Web App: Example- if I want to automate account creation in Dynamics 365 Customer Engagement

Select your UI app and click ‘Next’

Screen Shot 2019-12-08 at 12.23.41 pm

Step 6: Download the UI Flows Installer and run it

6a. UI flow installer here https://go.microsoft.com/fwlink/?linkid=2102613

6b. Activate UI flow browser extension

6c. Install Selenium IDE https://go.microsoft.com/fwlink/?linkid=2107665

That’s all you need to get started.

Note: The above steps are complete if you are running UI flow manually every time

Run a UI flow from a button, business process flow or an event

To do this, you will have to follow additional set up steps:

Note: This would differ based on which app you’ve selected desktop or web but you would not need any other steps than the one mentioned below. For web app, you will be asked to select a browser from Edge chromium or google chrome.

Step 7: Create another Flow from which you want to trigger UI flow (or include Ui flow as a step in there)

Step 8: Connection

When you add the UI flow step, you will be asked about connection with following attributes:

Connection name: Name it anything logical

Username: “domain/name” this is the username of your machine/laptop. Just in case you’re using a personal laptop and don’t know about your domain name or username, you can check it by going windows start button and type cmd. Next type %username%

Screen Shot 2019-12-08 at 12.52.55 pm.png

Password: This is your machine’s/laptops password

Gateway: Click on new gateway if you’ve not created one yet and move to Step 9.

Screen Shot 2019-12-08 at 12.59.48 pm.png

Step 9: Install On-premise data gateway https://docs.microsoft.com/en-gb/data-integration/gateway/service-gateway-update?WT.mc_id=BA-MVP-5003605

Email, username and password while setting this up would be the same which you used to login to flow.microsoft.com (in most cases). This will establish your connection with azure

Make sure that assign permissions  to ‘NT Service\PBIEgwService’  for this folder/path C:\Windows\ServiceProfiles\PBIEgwService\Documents\Power BI Desktop\Custom Connectors

Screen Shot 2019-12-08 at 12.45.04 pm

As of today, that’s all you need to run a UI flow. This feature is still in preview so please expect enhancements and changes.

If you want to see how to make a UI Flow, please stay tuned as I will release a video soon.

Hope it helps!

Subscribe to my channel and follow my blog.

Thanks!

Let’s keep sharing!